Showing posts with label DSM. Show all posts

Sunday, July 13, 2014

Free space by sending your iTunes media to your Synology!

I don't like having my iTunes library on my Mac. Main reason is that it occupies a LOT of space. Besides all the music you have downloaded and it's artworks, which can already be several GBs, iTunes also backs up to your Mac all IOS apps you downloaded. Even if you delete them on your iPad or iPhone , they stay on your Mac - depending on how many apps you have and the size of them, this can be huge.

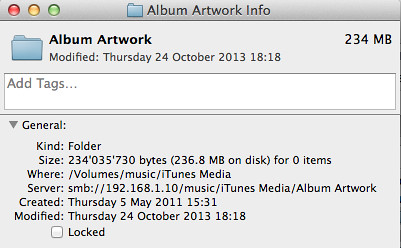
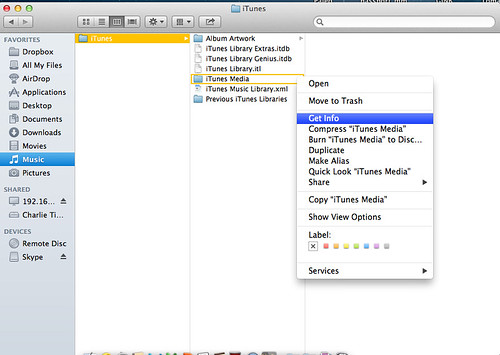
Don't believe me? If you have default Itunes settings, On your Mac go to Music -> iTunes. Under the subfolders iTunes Media right click ( or option click ) and choose "Get info". Check the window that appears for the size of this folder. Do the same for "Album Artwork".
Charlietechlife.blogspot.com
Free space by sending your iTunes library to your Synology!

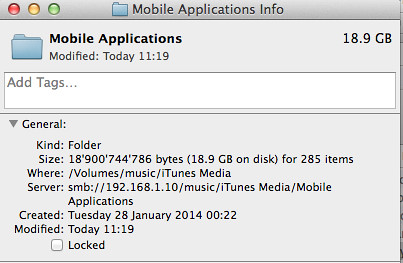
On my computer, Album artworks occupy 234Mbs, and iTunes media a whopping 18.9GBs!!!
Charlietechlife.blogspot.com
Free space by sending your iTunes library to your Synology!
Charlietechlife.blogspot.com
Free space by sending your iTunes library to your Synology!


I don't need all these things on my Mac - IOS apps are useless to keep there, and even music will be heard on my iPhone, so why keep it on the Mac? And with the latest MacBook Air and MacBook Pro using SSD there isn't a lot of spare space.

iTunes has no setting that allows you to specify where to keep specific music or app files. There is just one setting to send all iTunes library. And the incorporated Synology "iTunes server" package created a shared media server, not what I need.

So I decided to find a smart way to get space back by sending apps and music to the Synology.

!This solution will only work if you sync / use iTunes on the same network that you have your Synology!

The basic idea is that you create a alias the points from the iTunes media folder on your Mac, to a folder on your Synology. ITunes will still think it is accessing "iTunes media" on the local computer, but in reality it is accessing the Synology folder!

1) Create a shared folder on the Synology. For this example I created one called iTunesSynology, but it can have any name.

2) Ensure iTunes is closed on the computer and you don't launch it accidentally ( I.e. Via plugging in an iPhone or ipad ).

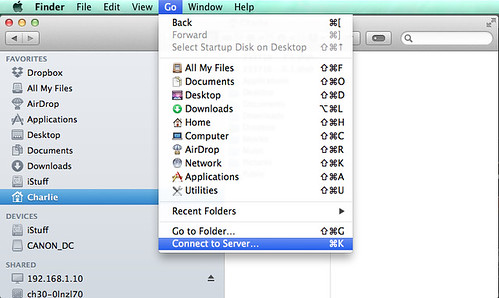
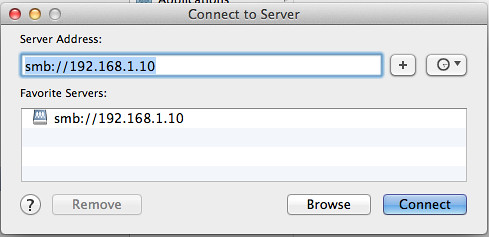
3) Ensure you are connected via some file sharing protocol to your Synology and to the "iTunesSynology" shared folder I use SMB, out you can also use AFP. To connect to the shared drive:

Finder -> Go -> Connect to server
Charlietechlife.blogspot.com
Free space by sending your iTunes library to your Synology!

After you need to put in the Synology IP, password and login:
Charlietechlife.blogspot.com
Free space by sending your iTunes library to your Synology!

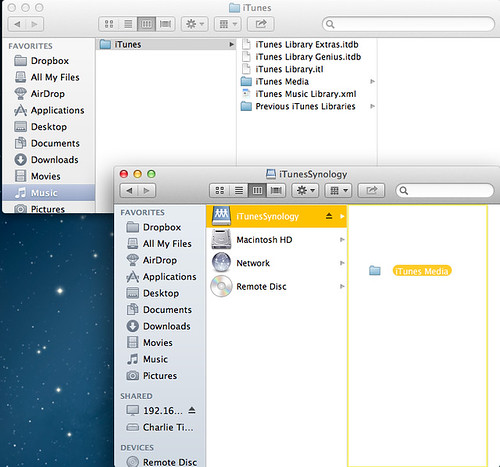
In Finder, go to the shared tab and open iTunesSynology folder under the Synology server.

For this to work, every time you use iTunes you need to ensure you are connected to the Synology "iTunes" shared folder via the step above.

4) Move the "iTunes Media" and "Album Artwork" folders from under the Mac ->Music -> iTunes folder to the "ITunesSynology" folder on the Synology
Charlietechlife.blogspot.com
Free space by sending your iTunes library to your Synology!

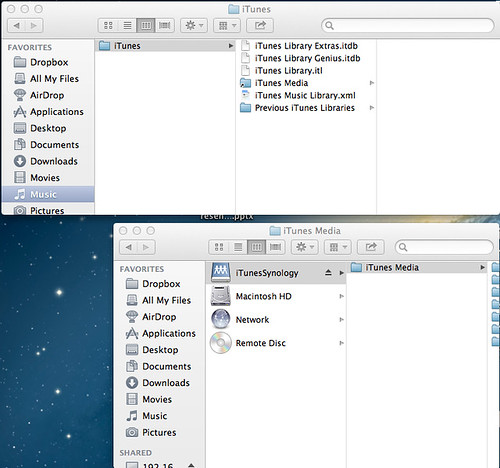
5) When the file transfer has finished, while pressing Command and Option (Alt) key on the keyboard, drag the "iTunes Media" folder back to the iTunes folder on the Mac. If you are doing it right, the folder icon should have an arrow on it while you drag, and in the end should look like this ( note the arrow on top of the folder icon of iTunes media on the Mac ):
Charlietechlife.blogspot.com
Free space by sending your iTunes library to your Synology!

6) Launch iTunes! Test a couple of songs, it should work perfectly!!! Just make sure before iTunes opens that you are connected to your Synology.

Congratulations, you just released quite a couple of GBs off your Mac!


Wednesday, April 23, 2014

Sync Synology with Dropbox and Google Drive

With DSM 5.0 Synology introduced a feature a lot of people have been asking for - the possibility to sync or use your Synology with Dropbox or Google Drive.

What a cool way to:

1) transfer files from whatever to your Synology! Dropbox or Google Drive is compatible with almost every platform out there, be it Mac, Windows, IPhone, iPad, Android or Windows phone. As soon as you upload for example a picture from your iPhone to Dropbox, it will automatically be synced to your Synology.

2) Share! If you have a shared folder in Dropbox, by adding a file to that folder on your Synology, you are sending it to people you have that particular folder shared with.

3) Cloud Backup! Google has taken a decision in March 2014 to slash prices of google drive. I currently use Amazon Glacier on my Synology to backup a lot of information - mostly Pictures and videos. As per my blog post on why I bought the Synology it had an automatic upload system to Glacier and my monthly cost for an online backup of a lot of information (TBs) is only around 5$.

However Amazin Glacier has disadvantages. It had no dedicated program to upload / download info. Files are stores without filenames, so the program you use needs to solve this. And finally it is sloooowwww. A request to take something out of Glacier takes approx 4 hours to start the download, and is extremely slow to send. Good for cheap backup of files you do not need in a rush or to modify often, but not for much more.

So, back to google drive. With the price slash, google is turning storage into a commodity. For a whopping 1TB of info, google charges only 9.99$ per month! If you need less, 100Gb for only 1.99USD And we all know the advantages of google drive - it's fast, secure, files are just there, it even keeps previous copies.


Any limitations?

I only saw:

1) you can only synchronize your complete Dropbox or Google Drive folder. You can't select a set of subfolders. It's either everything or nothing!

2) for the Mac you might be wasting Synology space with multiple backups. If you use Time Machine on your Mac with Synology with your backup disk and you have Dropbox installed it is backing up th 2-10Gbs of info via time capsule to the Synology and if you install this sync it repeats the info again. The solution? Tell Time Capsule to exclude the Dropbox folder from the backup.


How to install?

You need:

- A Synology installed with DSM 5 and internet access. If unsure on what version you have, It should show on the bottom left DSM 5.0 on the main window.

- Basic knowledge around the Synology interface

- A Google Drive or Dropbox account


With the above checked, let's start!

1) Log in to your Synology and head over to the package center.

2) In the upper right corner of the package center is a search box. Search for Cloud.

3) 3 options should appear - Cloud station, Cloud Station Client ( both for making your personal cloud) and Cloud Sync. Press Cloud Sync for more information ( as image below ) or directly press install.

4) After installing when you enter the base menu a new option appears called Cloud Sync. Open the application.

Synology DSM 5.0 main menu

5) When you enter the program for the first time, it will automatically open up the connection wizard. Select the service you want to configure. We will start with Dropbox. Select it and press next.

Synology Cloud Sync Wizard

6) a pop-up window will appear asking you to allow cloud sync to access your Dropbox. If you are not already logged onto Dropbox in your browser, you will need to login before the allow screen appears.

Synology Cloud Sync
7) The pop-up will disappear, and the wizard will continue. The next step is to select where you want the Dropbox folder synced. Remember it will be the whole Dropbox, including every subfolders and file. On my Synology I created a separate shared folder just for this with it's own permissions.
Synology Cloud Sync
Synology Cloud Sync wizard folder

7) After pressing Apply, the app will start syncing automatically. Anything changed in your Dropbox will mirror in the folder you selected, like any other Dropbox app. Anything you change in the Synology Dropbox folder will change everywhere else as well.

Synology Cloud Sync Main Window

In the top corner of your Synology main page a cloud icon will appear. It will reflect the status of your sync. A green tick is synced, a blue sync in progress. Depending how many files you have it will take more or less time for the first sync.


Synology main screen with iCloud sync

And Google Drive? Can I have both at the same time?

Yes, both can be installed. The process is exactly the same.

1) Open Cloud Sync. Press the + button on the bottom left to start the wizard.

Synology cloud sync main window

2) Select Google Drive on the first wizard screen and press next

Synology Cloud Sync wizard

3) A pop-up will appear to validate the access with Google. Press accept. If you are not logged into google on the browser, a login screen will appear first.

Synology google accept

4) select the folder where you want to Sync. Press apply and...

5) The sync will start!

Synology cloud sync main window

Wait until both accounts turn green. All files have been downloaded both for Dropbox and Google drive.


As a personal backup options for your files, I would recommend google drive given the 1Tb pricing being so cheap. For sharing and having folders synced with friends / family, Dropbox still wins for me.


Enjoy!