Showing posts with label iPad Air. Show all posts

Sunday, July 13, 2014

Free space by sending your iTunes media to your Synology!

I don't like having my iTunes library on my Mac. Main reason is that it occupies a LOT of space. Besides all the music you have downloaded and it's artworks, which can already be several GBs, iTunes also backs up to your Mac all IOS apps you downloaded. Even if you delete them on your iPad or iPhone , they stay on your Mac - depending on how many apps you have and the size of them, this can be huge.

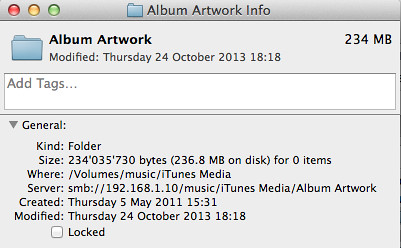
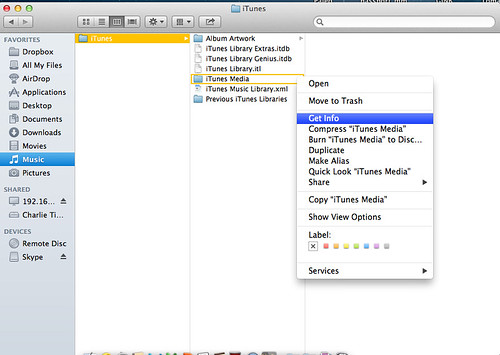
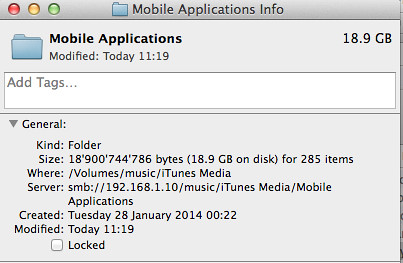
Don't believe me? If you have default Itunes settings, On your Mac go to Music -> iTunes. Under the subfolders iTunes Media right click ( or option click ) and choose "Get info". Check the window that appears for the size of this folder. Do the same for "Album Artwork".
Charlietechlife.blogspot.com
Free space by sending your iTunes library to your Synology!

On my computer, Album artworks occupy 234Mbs, and iTunes media a whopping 18.9GBs!!!
Charlietechlife.blogspot.com
Free space by sending your iTunes library to your Synology!
Charlietechlife.blogspot.com
Free space by sending your iTunes library to your Synology!


I don't need all these things on my Mac - IOS apps are useless to keep there, and even music will be heard on my iPhone, so why keep it on the Mac? And with the latest MacBook Air and MacBook Pro using SSD there isn't a lot of spare space.

iTunes has no setting that allows you to specify where to keep specific music or app files. There is just one setting to send all iTunes library. And the incorporated Synology "iTunes server" package created a shared media server, not what I need.

So I decided to find a smart way to get space back by sending apps and music to the Synology.

!This solution will only work if you sync / use iTunes on the same network that you have your Synology!

The basic idea is that you create a alias the points from the iTunes media folder on your Mac, to a folder on your Synology. ITunes will still think it is accessing "iTunes media" on the local computer, but in reality it is accessing the Synology folder!

1) Create a shared folder on the Synology. For this example I created one called iTunesSynology, but it can have any name.

2) Ensure iTunes is closed on the computer and you don't launch it accidentally ( I.e. Via plugging in an iPhone or ipad ).

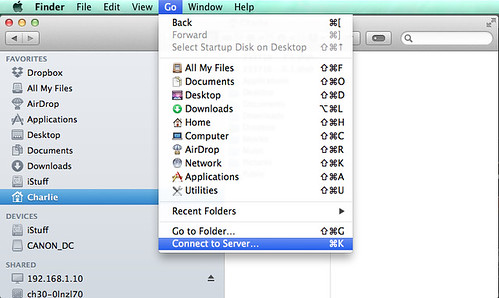
3) Ensure you are connected via some file sharing protocol to your Synology and to the "iTunesSynology" shared folder I use SMB, out you can also use AFP. To connect to the shared drive:

Finder -> Go -> Connect to server
Charlietechlife.blogspot.com
Free space by sending your iTunes library to your Synology!

After you need to put in the Synology IP, password and login:
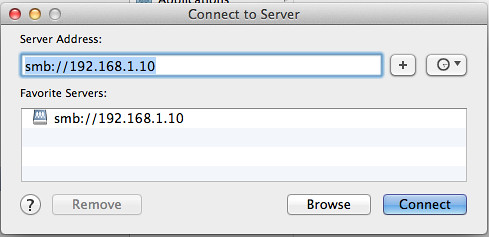
Charlietechlife.blogspot.com
Free space by sending your iTunes library to your Synology!

In Finder, go to the shared tab and open iTunesSynology folder under the Synology server.

For this to work, every time you use iTunes you need to ensure you are connected to the Synology "iTunes" shared folder via the step above.

4) Move the "iTunes Media" and "Album Artwork" folders from under the Mac ->Music -> iTunes folder to the "ITunesSynology" folder on the Synology
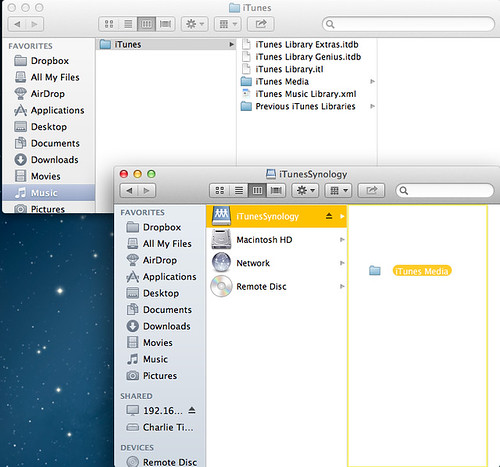
Charlietechlife.blogspot.com
Free space by sending your iTunes library to your Synology!

5) When the file transfer has finished, while pressing Command and Option (Alt) key on the keyboard, drag the "iTunes Media" folder back to the iTunes folder on the Mac. If you are doing it right, the folder icon should have an arrow on it while you drag, and in the end should look like this ( note the arrow on top of the folder icon of iTunes media on the Mac ):
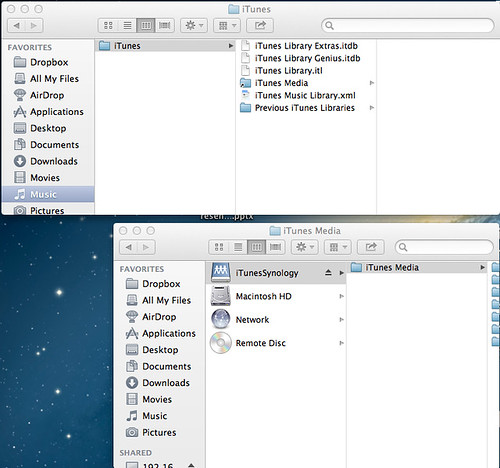
Charlietechlife.blogspot.com
Free space by sending your iTunes library to your Synology!

6) Launch iTunes! Test a couple of songs, it should work perfectly!!! Just make sure before iTunes opens that you are connected to your Synology.

Congratulations, you just released quite a couple of GBs off your Mac!


Saturday, December 07, 2013

Streaming Movies & Series from Synology to AppleTV

Synology has several ways for video streaming from it's hard drives. The one I use the most is sending via DLNA to the Playstation3, which means that it appears on the PS3 menu.Adding an AppleTV to the home network I wanted a way to stream to the it as well, not just to have 2 ways of doing the same thing, but sometimes with my DVD backups (I prefer to have all movies on 1 hard drive and choose then opening DVD boxes and swapping discs) I get the Cinavia protection error on the PS3.Unfortunately AppleTV doesn´t have DLNA, however synology has thought of a solution.

Synology has an app for IOS devices called Video Station. I normally use it to stream video to my IOS device out of home. So when I'm at the airport or train, I can see videos directly from my Synology which is at home over the internet, only requirement being a 3G or wifi connection. If you are in your home network, as of the latest update you can choose to send to AppleTV.

How to use:1) Download & Install the Video Station package on the Synology2) Download the DS Video app from iTunes on your iPhone or iPad3) Ensure you have the correct ports open for your home network.

Video Station5000 (HTTP), 5001 (HTTPS), 9025-9040,
5002, 5004, 65001 (for using the HDHomeRun network tuner)
TCP
DS video5000 (HTTP), 5001 (HTTPS)TCP

For more ports see the following link:https://www.synology.com/en-global/support/faq/299

4) On the Synology you just need to make sure that the Media Server has within the directories it has indexed the one with your media files. The Video Station will see the files and automatically search the internet for the information needed to show on it´s page, including IMDB link.

5) Open the app and login

6) Press the play button

7) Press the icon on the bottom right and choose AppleTV


8) Wait 1 minmute while it sets up and done it's on the TV!

I've only seen two limitation, first is that you must keep the app open for the duration of the movie, even multitasking is not allowed and second it takes a while to start playing the movie for the first time (1 - 2 minutes)


Sunday, November 10, 2013

iPad Air: setting up for the first time


When you get your new iPad Air out of it's box, you really want to turn it on!

 
This is a tutorial on how to set it up as a fresh, new IPad, not restoring it from a previous backup.
 
First screen is a Hello screen which will do a sideshow of the word hello in several languages, to start the initial set-up slide from the arrow to the right.
IPad Air IOS 7: first set-up  charlietechlife.blogspot.com
 
In the next screen choose which language you want the iPad to be in, when you press it will go automatically to the next screen
 
IPad Air IOS 7: first set-up  charlietechlife.blogspot.com
 
Select your country or region from the next screen. This will help the iPad set-up regional settings such as how it shows the date, the currency, numbers, etc... It also will default your App Store to that country - it is easily changed after if needed.
 
IPad Air IOS 7: first set-up  charlietechlife.blogspot.com
 
The next setting is wifi. If you aren't setting up tethered to a computer with iTunes you will need wifi to proceed aporia install apps. Press on your wifi and insert the password if you have one.
 
IPad Air IOS 7: first set-up  charlietechlife.blogspot.com
 
The iPad will take a few moments to contact Apple's servers and activate itself
 
IPad Air IOS 7: first set-up  charlietechlife.blogspot.com
 
Next screen is to turn location services on or off. If you are extremely concerned with privacy I would turn them off otherwise keep them on as to have applications such as maps know where you are and be able to supply directions or even have the iPad change the time automatically when you go to a new time zone.
IPad Air IOS 7: first set-up  charlietechlife.blogspot.com
 
In the next screen you can restore settings from another iPad device (if you are upgrading or changing iPad) from iCloud or from iTunes. Since we are setting up the iPad as a new device, we press set up as new iPad.
 
IPad Air IOS 7: first set-up  charlietechlife.blogspot.com
 
Next screen is to set-up your Apple ID. Very useful for downloading apps or music on the App Store / iTunes music store or for FaceTime calls. If you don't have an Apple ID yet you can create one here.
IPad Air IOS 7: first set-up  charlietechlife.blogspot.com
 
Next screen is for you to agree with Apple's terms and conditions. The agree button is way down on the button to the right. Another pop up comes up. Press agree again.
 
 
IPad Air IOS 7: first set-up  charlietechlife.blogspot.com
 
IPad Air IOS 7: first set-up  charlietechlife.blogspot.com
 
It will take a few minutes to communicate with Apple and set-up your ID
 
iPad Air IOS 7 first set-up  charlietechlife.blogspot.com
 
Next screen is about iCloud. iCloud can automatically synchronizes several items with apple servers. The advantage for you is that it is a secure online backup ( in case your iPad is stolen or breaks ) and it automatically pushes to your other Apple devices - such as a picture that you take with the iPad will appear automatically on your iPhone or on iPhoto on your MacBook if they are logged on to the same Apple ID. You can choose what to synchronize afterwards, options are email, contacts, calendar, reminders, Safari history / favourites, notes, the new keychain, photos, documents and apps and find my iPad.
 
iPad Air IOS 7 first set-up  charlietechlife.blogspot.com
 
Next screen after iCloud is Find my iPad! which allows you to pinpoint on a map where your iPad is, if it is connected to a wifi or 3G, and even send messages, lock it or in extreme cases erase all it's info A very useful feature that most people don't know about. 
Imagine you lost your iPad, you can send a message to it that appears on the lock screen saying:
Please contact phone number xxxxx 
To try and get it back.
I would have it enabled.
 
iPad Air IOS 7 first set-up  charlietechlife.blogspot.com
 
After choosing Find my iPad, the next screen you can choose if you want iMessage and FaceTime activated and in which email / phone number people can reach you. Have ticked where you want people to be able to FaceTime you. You can turn off iMessage or FaceTime individually later.
iPad Air IOS 7 first set-up  charlietechlife.blogspot.com
After all these iCloud settings it will take a few minutes to set it up:
iPad Air IOS 7 first set-up  charlietechlife.blogspot.com
 
It will then set-up the lock screen passcode. Insert a four digit number you can remember.
 
iPad Air IOS 7 first set-up  charlietechlife.blogspot.com
 
You can set-up the iCloud keychain, useful if you have multiple Apple devices to keep passwords. Particularly useful if you have a Mac with MacOS Mavericks and you don´t want to memorise a lot of passwords. Not sure how secure it is yet….
 
iPad Air IOS 7 first set-up  charlietechlife.blogspot.com
 
And done! Press get started to start using your new iPad!!!
 
 
iPad Air IOS 7 first set-up  charlietechlife.blogspot.com
 
In the next post, how to set-up email and others!


Thursday, November 07, 2013

iPad Air Diary: Day 2


24 hours afterwards, here are some more impressions of the iPad Air.

 
Coming from an iPad 1, the size and especially the weight continue to impress. Weight wise, it's really light. Continueing Apple's comparison with pencils, it weighs less than a box of Caran D'ache color pencils - it's that light. 
Reading with it is enjoyable as holding it up over a long period of time doesn't tire you.
 
Size, it's small and thin - really thin. Since I didn't buy a cover yet, I currently stor it in the backpack in the middle of a bunch of A4 sized papers  I'm reading. It gets lost in there.
 
After you start using it, there are two things that you notice - first is the retina display! A big difference when upgrading from a previous non-retina device. Your eyes can see the difference. Especially if you go back to using the old device it now seems that everything has jagged edges, like if you were seeing a 8bit video game.
 
Second is the touchscreen, the iPad airs has an improved feel to it when typing. It has a softer feel than the iPad 1. It's like the 1 is a hard glass surface with no flexibility, whilst the iPad air has a slight impact absorption to it - like it's not 100% hard. Much better when typing for long periods of time!
 
The speed is MUCH better than the original iPad, however I'm not very impressed. Reading about the iPad air on the internet, tech blogs compare it's power to that of a 2010 MacBook Air. However while using it doesn't feel that fast. I haven't done CPU intensive tasks such as movie editing with iMovie, so it may be because of IOS7 animations ( I'm still keeping my IPhone on iOS6, so it's my first experience ), however the opening of apps, games, switching apps, they all seem to go at a "normal" speed - not blazing quick.
 
So, what did I do on day 2?
 
I installed the iPad as a new device vs from the backup of my iPad 1, so the first hours were spent installing apps, email addresses, calendars, etc...
 
Apps: One really good thing of the iPad air is that Apple offers iWork and iLife apps (Pages, Numbers, Keynote and iMovie, iPhoto and GarageBand) for free automatically. You just need to enter the App Store and download them - it changes the price to free if you enter with the iPad air. Good news is you can then sync to iTunes on a Mac / PC and resync the apps to all other IOS devices such as your iPhone - it is still free.
 
iPad air
 
The wifi when downloading is quick, but given the new apple technology I expected more. It's .. Normal.
 
Email / contacts: pretty straightforward as with any IOS device. For gmail, hotmail, etc.... It's very easy with a dedicated set-up for these types of email:
iPad air
For other types of email, it helps to have the settings such as server name, incoming / outgoing port numbers, etc....
 
The only issue I've seen is with Facebook integration. For some reason the Facebook integration rejected my password and now doesn't let me change / add a new one. And it constantly gives the error message below:
 
IOS7.0.3 facebook error
 
When I have a solution I'll post it to the blog.

Tuesday, November 05, 2013

iPad Air Diary: Day 1, Set-up and first impression review

It's my birthday. Well, almost my birthday but lucky for me my wife likes to give presents before.

But before opening the gift, some background so you see why my impressions of the iPad air are what they are. I got the original iPad as a birthday gift (amazing wife I have) when it came out in 2010. I never would have bought it - thought it was a silly over sized version of an iPhone but when I got it, I couldn't put it down. Really. I would spend sleepless hours in bed touching, pointing, reading, playing. It was THAT magical.
Recently my iPad 1 still has it's place on the living room table, but I use it less and less. Why? because it simply got too slow, and lost the magic of everything just working quickly. Using safari is a struggle, opening several webpages almost impossible. HD movies stagger on it. I think it's "normal" as the iPad 1 was a Steve Job's experiment and nobody knew at the time it would have the amazing sell-out that it did. It had reduced CPU and memory specs, which Apple would improve a lot with the iPad 2, which is still sold to date. The poor 1 didn't age well, making me prefer to use my 2010 Macbook Pro which with a SSD hard drive upgrade flies....

Fast  forward to 2013...
Out from hiding comes a little bag with my gift. My first look at the bag left me perplexed, I had said (not directly) that I might like to have an iPad but this box is too small! Opening the wrapping, it's definitely an Apple box and... YES! An iPad! I open the box and pull it out. But, my first thought was "Oh crap!" she bought the iPad mini and that just seeing the size of the box! When I open it and see the device, I was convinced - she really bought the iPad mini - how do I tell her to exchange it?

iPad Air WiFi 32Gb White / Silver MD789LL/A


But no, reading the box, it's a brand new Silver iPad Air 32Gbs Wifi only model, just what i wanted! It's that small! at least for someone used to an iPad 1. How does Apple do it? I ran for my iPad 1 and compared.

iPad 1 vs. iPad Air

Of course the iPad cover does´t help….so taking it off

The screen size is similar, however they reduced the bezel and made in extremely thin. As thin as a pencil, just like the Apple ad ...

Turn it on and the screen is much more detailed than the iPad 1! I spent the whole night configuring, installing email, apps, etc...
Still remember when we used to need to many things tethered to iTunes, nowadays it's all via wifi. Wow!

More review to come on diary day 2....

I love my new iPad Air already, however there is one thing that I miss - the feeling of magic! This is probably what is missing in the post Steve Jobs era, somebody that invents products that WOW you and change your habits dramatically. The first iPad did that for me. This iPad is an upgraded version of that, fast, beautiful, light - but it is an iPad.