Showing posts with label iPhone. Show all posts

Sunday, July 13, 2014

Free space by sending your iTunes media to your Synology!

I don't like having my iTunes library on my Mac. Main reason is that it occupies a LOT of space. Besides all the music you have downloaded and it's artworks, which can already be several GBs, iTunes also backs up to your Mac all IOS apps you downloaded. Even if you delete them on your iPad or iPhone , they stay on your Mac - depending on how many apps you have and the size of them, this can be huge.

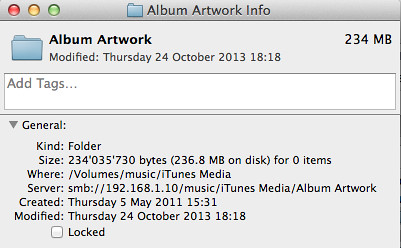
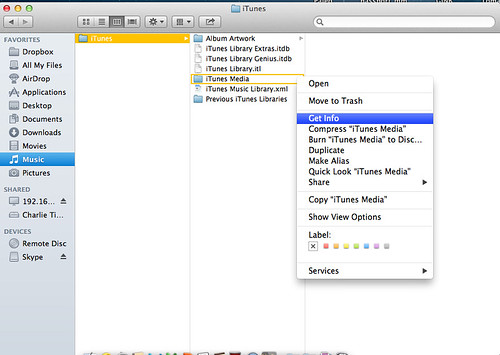
Don't believe me? If you have default Itunes settings, On your Mac go to Music -> iTunes. Under the subfolders iTunes Media right click ( or option click ) and choose "Get info". Check the window that appears for the size of this folder. Do the same for "Album Artwork".
Charlietechlife.blogspot.com
Free space by sending your iTunes library to your Synology!

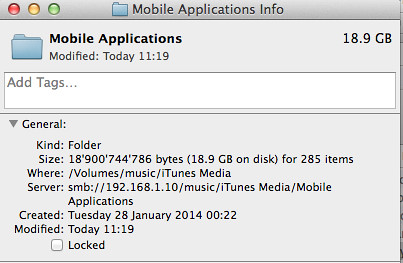
On my computer, Album artworks occupy 234Mbs, and iTunes media a whopping 18.9GBs!!!
Charlietechlife.blogspot.com
Free space by sending your iTunes library to your Synology!
Charlietechlife.blogspot.com
Free space by sending your iTunes library to your Synology!


I don't need all these things on my Mac - IOS apps are useless to keep there, and even music will be heard on my iPhone, so why keep it on the Mac? And with the latest MacBook Air and MacBook Pro using SSD there isn't a lot of spare space.

iTunes has no setting that allows you to specify where to keep specific music or app files. There is just one setting to send all iTunes library. And the incorporated Synology "iTunes server" package created a shared media server, not what I need.

So I decided to find a smart way to get space back by sending apps and music to the Synology.

!This solution will only work if you sync / use iTunes on the same network that you have your Synology!

The basic idea is that you create a alias the points from the iTunes media folder on your Mac, to a folder on your Synology. ITunes will still think it is accessing "iTunes media" on the local computer, but in reality it is accessing the Synology folder!

1) Create a shared folder on the Synology. For this example I created one called iTunesSynology, but it can have any name.

2) Ensure iTunes is closed on the computer and you don't launch it accidentally ( I.e. Via plugging in an iPhone or ipad ).

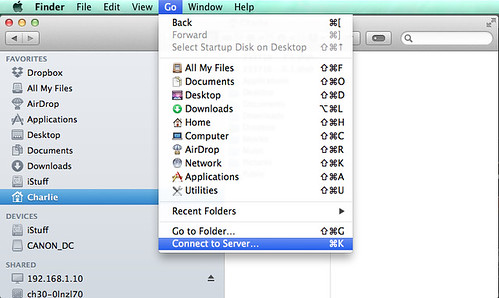
3) Ensure you are connected via some file sharing protocol to your Synology and to the "iTunesSynology" shared folder I use SMB, out you can also use AFP. To connect to the shared drive:

Finder -> Go -> Connect to server
Charlietechlife.blogspot.com
Free space by sending your iTunes library to your Synology!

After you need to put in the Synology IP, password and login:
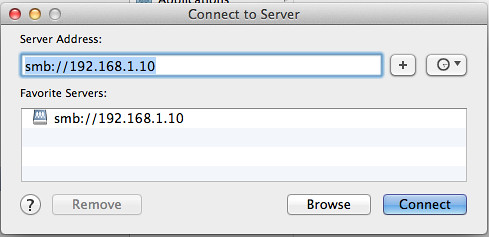
Charlietechlife.blogspot.com
Free space by sending your iTunes library to your Synology!

In Finder, go to the shared tab and open iTunesSynology folder under the Synology server.

For this to work, every time you use iTunes you need to ensure you are connected to the Synology "iTunes" shared folder via the step above.

4) Move the "iTunes Media" and "Album Artwork" folders from under the Mac ->Music -> iTunes folder to the "ITunesSynology" folder on the Synology
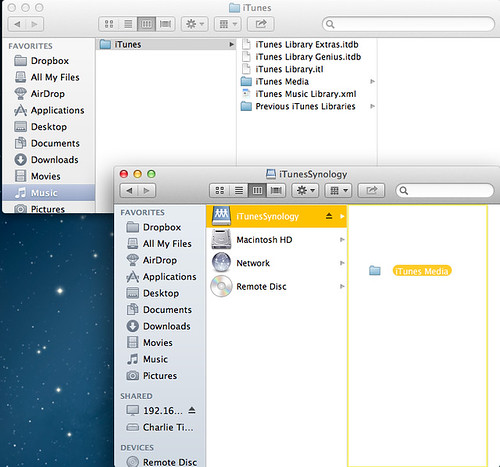
Charlietechlife.blogspot.com
Free space by sending your iTunes library to your Synology!

5) When the file transfer has finished, while pressing Command and Option (Alt) key on the keyboard, drag the "iTunes Media" folder back to the iTunes folder on the Mac. If you are doing it right, the folder icon should have an arrow on it while you drag, and in the end should look like this ( note the arrow on top of the folder icon of iTunes media on the Mac ):
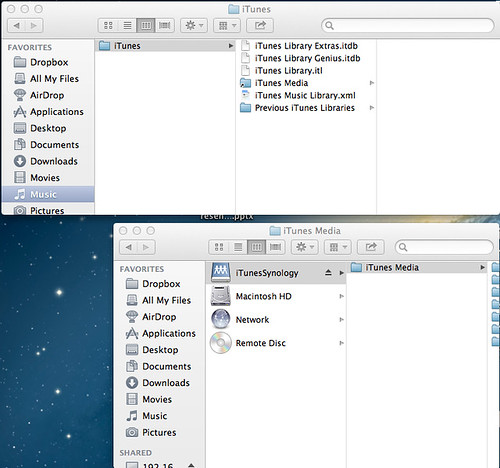
Charlietechlife.blogspot.com
Free space by sending your iTunes library to your Synology!

6) Launch iTunes! Test a couple of songs, it should work perfectly!!! Just make sure before iTunes opens that you are connected to your Synology.

Congratulations, you just released quite a couple of GBs off your Mac!


Saturday, December 07, 2013

Streaming Movies & Series from Synology to AppleTV

Synology has several ways for video streaming from it's hard drives. The one I use the most is sending via DLNA to the Playstation3, which means that it appears on the PS3 menu.Adding an AppleTV to the home network I wanted a way to stream to the it as well, not just to have 2 ways of doing the same thing, but sometimes with my DVD backups (I prefer to have all movies on 1 hard drive and choose then opening DVD boxes and swapping discs) I get the Cinavia protection error on the PS3.Unfortunately AppleTV doesn´t have DLNA, however synology has thought of a solution.

Synology has an app for IOS devices called Video Station. I normally use it to stream video to my IOS device out of home. So when I'm at the airport or train, I can see videos directly from my Synology which is at home over the internet, only requirement being a 3G or wifi connection. If you are in your home network, as of the latest update you can choose to send to AppleTV.

How to use:1) Download & Install the Video Station package on the Synology2) Download the DS Video app from iTunes on your iPhone or iPad3) Ensure you have the correct ports open for your home network.

Video Station5000 (HTTP), 5001 (HTTPS), 9025-9040,
5002, 5004, 65001 (for using the HDHomeRun network tuner)
TCP
DS video5000 (HTTP), 5001 (HTTPS)TCP

For more ports see the following link:https://www.synology.com/en-global/support/faq/299

4) On the Synology you just need to make sure that the Media Server has within the directories it has indexed the one with your media files. The Video Station will see the files and automatically search the internet for the information needed to show on it´s page, including IMDB link.

5) Open the app and login

6) Press the play button

7) Press the icon on the bottom right and choose AppleTV


8) Wait 1 minmute while it sets up and done it's on the TV!

I've only seen two limitation, first is that you must keep the app open for the duration of the movie, even multitasking is not allowed and second it takes a while to start playing the movie for the first time (1 - 2 minutes)


Saturday, October 26, 2013

#Mavericks & iTunes error

After reinstalling Mavericks, I tried synchronising iTunes (after copying back my library from the previous installation) and my iPhone. I got the following error message “The iPhone “xxx" could not be synced because this computer is no longer authorized for purchasing items that are on this iPhone."
Mavericks iTunes error
I believe it´s because me and my wife both used the phone, so we had a mix of apps she purchased under her ID and some I purchased under mine. One app is not allowing us to sync
The solution is:
1)on the  iPhone go to Settings->Store. If the following screen appears you are signed in. Press your AppleID and sign out.
iPhone settings

You should now have this screen. If you already did, do nothing
iPhone settings
2) On iTunes go to Store -> deauthorize this computer. Enter login and password
3) On iTunes go to the iPhone -> Apps. Remove all apps (don´t worry, you will reinstall them)
4) On iTunes, press sync
5) On iTunes go to Store -> Authorize this computer. Enter login and password
6) On iTunes go to the iPhone -> Apps. Reinstall apps.