Showing posts with label MACOS. Show all posts

Sunday, July 13, 2014

Free space by sending your iTunes media to your Synology!

I don't like having my iTunes library on my Mac. Main reason is that it occupies a LOT of space. Besides all the music you have downloaded and it's artworks, which can already be several GBs, iTunes also backs up to your Mac all IOS apps you downloaded. Even if you delete them on your iPad or iPhone , they stay on your Mac - depending on how many apps you have and the size of them, this can be huge.

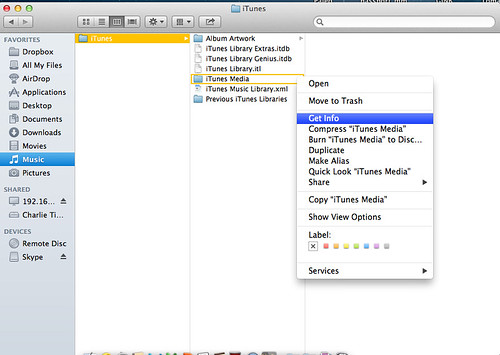
Don't believe me? If you have default Itunes settings, On your Mac go to Music -> iTunes. Under the subfolders iTunes Media right click ( or option click ) and choose "Get info". Check the window that appears for the size of this folder. Do the same for "Album Artwork".

Charlietechlife.blogspot.com
Free space by sending your iTunes library to your Synology!

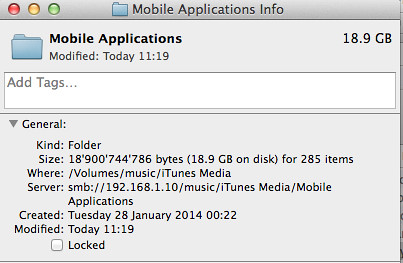
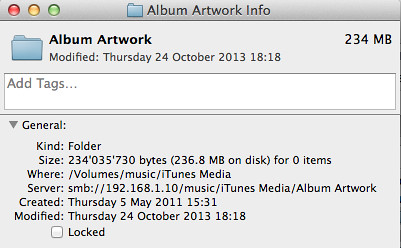
On my computer, Album artworks occupy 234Mbs, and iTunes media a whopping 18.9GBs!!!

Charlietechlife.blogspot.com
Free space by sending your iTunes library to your Synology!
Charlietechlife.blogspot.com
Free space by sending your iTunes library to your Synology!


I don't need all these things on my Mac - IOS apps are useless to keep there, and even music will be heard on my iPhone, so why keep it on the Mac? And with the latest MacBook Air and MacBook Pro using SSD there isn't a lot of spare space.

iTunes has no setting that allows you to specify where to keep specific music or app files. There is just one setting to send all iTunes library. And the incorporated Synology "iTunes server" package created a shared media server, not what I need.

So I decided to find a smart way to get space back by sending apps and music to the Synology.

!This solution will only work if you sync / use iTunes on the same network that you have your Synology!

The basic idea is that you create a alias the points from the iTunes media folder on your Mac, to a folder on your Synology. ITunes will still think it is accessing "iTunes media" on the local computer, but in reality it is accessing the Synology folder!

1) Create a shared folder on the Synology. For this example I created one called iTunesSynology, but it can have any name.

2) Ensure iTunes is closed on the computer and you don't launch it accidentally ( I.e. Via plugging in an iPhone or ipad ).

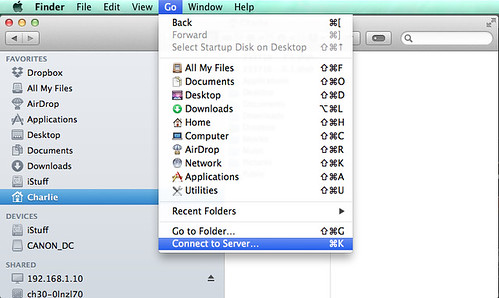
3) Ensure you are connected via some file sharing protocol to your Synology and to the "iTunesSynology" shared folder I use SMB, out you can also use AFP. To connect to the shared drive:

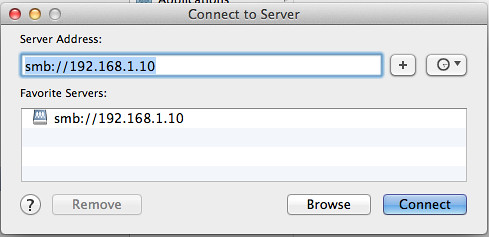
Finder -> Go -> Connect to server

Charlietechlife.blogspot.com
Free space by sending your iTunes library to your Synology!

After you need to put in the Synology IP, password and login:

Charlietechlife.blogspot.com
Free space by sending your iTunes library to your Synology!

In Finder, go to the shared tab and open iTunesSynology folder under the Synology server.

For this to work, every time you use iTunes you need to ensure you are connected to the Synology "iTunes" shared folder via the step above.

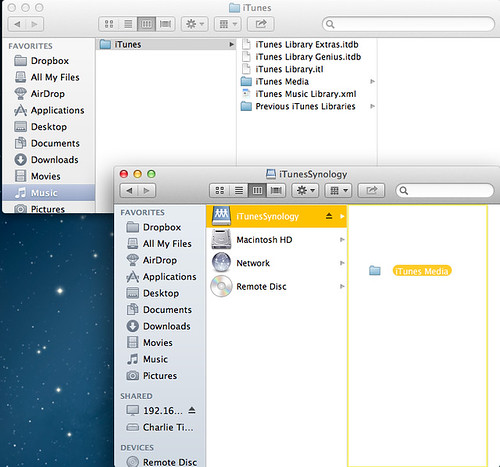
4) Move the "iTunes Media" and "Album Artwork" folders from under the Mac ->Music -> iTunes folder to the "ITunesSynology" folder on the Synology

Charlietechlife.blogspot.com
Free space by sending your iTunes library to your Synology!

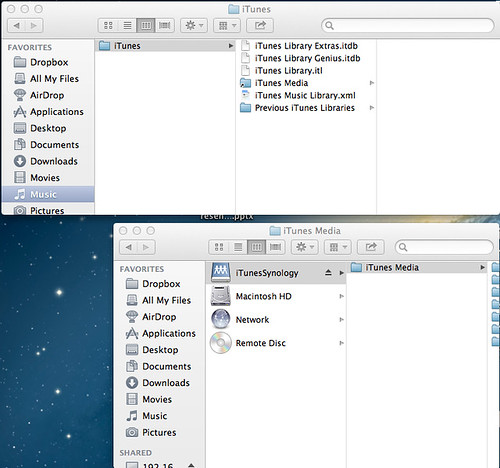
5) When the file transfer has finished, while pressing Command and Option (Alt) key on the keyboard, drag the "iTunes Media" folder back to the iTunes folder on the Mac. If you are doing it right, the folder icon should have an arrow on it while you drag, and in the end should look like this ( note the arrow on top of the folder icon of iTunes media on the Mac ):

Charlietechlife.blogspot.com
Free space by sending your iTunes library to your Synology!

6) Launch iTunes! Test a couple of songs, it should work perfectly!!! Just make sure before iTunes opens that you are connected to your Synology.

Congratulations, you just released quite a couple of GBs off your Mac!


Monday, May 12, 2014

MACOS & Synology tip: How to connect to a shared drive automatically on logon

I have a synology NAS mounted in my home network. Everytime I boot up my MacBook Pro I have to connect to the shared drives in the synology via the finder:

finder -> Go -> Connect to server


After you need to put the Synology IP, password and login.

Each time you boot your computer you need to do this. Now wouldn´t it be great if this was automatic? It can be! How to set it up:

Step #1: Connect to your shared drive via Finder following the steps above

Step #2: Add to your logon

- Open system preferences -> Users & Groups


Go to Login items

Press the + sign beneath the list of login items.

Navigate to the shared folder of the Synology. Any if the shared folders will work to automatically add the Synology on login.

It will now appear in the list of login items. If you are not on a local LAN it will display an error message of not being able to connect.

Check hide if you don.'to want a finder window to open. Close and voila!


Friday, April 18, 2014

Compress HD video for free from 10Gb to 1GB on a Mac

After using my automatic duplicate and big file finder on my Synology (see CharlieTechLife blog to set-up) I saw that I had several HD videos weighing a whopping 12 to 15Gb in .ts format. This means over 100GBs in vĂ­deos I see maybe once per year.
So I started investigating how I could compress those videos into a more reasonable size. My objective is to have each file reduced to approx. 1Gb with minimal quality loss and be compatible with playback on PS3, IOS devices, Windows, etc..., so I need a compression codec (divx, xvid, x264) and a container (.avi, .divx, .mkv) compatible with these devices.
On the Mac there are two software programs that are FREE that allow you to do just this. One is Handbrake, a free video transcoder that works extremely well. The second is Mediacalc, a bitrate calculator - it's there to ensure your video ends up being the right size.
After you download them following the links above, let's get started!
Fire up Handbrake. The interface is pretty straightforward.
Handbrake interface
Press source and select the video you want to compress. Under title you will see details of the video. Before our next step jot down the duration ( in my example it's.00:41:57). We will use this in a minute to ensure the compressed file is 1Gb.
As my Output setting options:
- Format: MP4 file. The mp4 format is playable across most platforms I need (iPad, IPhone, PS3, Xbox...)
- Large file size: uncheck. This is to enable 64bit - it allows files bigger than 4Gb for nonFAT32 systems. Will not affect any compression beneath this size, and if checked can limit compatibility
- Web Optimized: Checked. This places the container header in the beginning of the file. It will make the video start faster if streaming.
Under the video tab:
- Video Codec: H.264 (x.264). This codes into MPEG-4 part 10, also known as H.264/AVC. It gives much better quality and lower file sizes than the normal MPEG-4 / VP3 encoders and all modern devices like I want to use will support this format. (iPhone, iPad, BluRay Players, PS3, XBox360, etc....)
Framerate: Same as source. I want to keep the video quality as close to the original as possible. As such I keep the same frame rate as per the original one.
Variable framerate: ticked. I keep this as to imitate the original.
Video quality: Average bitrate. Here there is no preview available to see how the video comes out in terms of quality or size, be it using constant quality or average bitrate option. As my main limitation is size, if I wanted to use the constant quality option I would need to try a number on the scale, compress, see file size, try another number and compress again. So for a specific size, I use average bitrate.
2-pass encoding: ticked. Takes longer (almost double the time), but results are worth it.
Mediacalc:
MediaCalc

We will just use the first Calculation part of the application. We fill in:
- Media size: 1Gb. This is the final size we want.
- Video Duration: 41.57. Here we put the exact size of our original video that we jotted down from handbrake as per above.
- Audio bitrate: 160kbps. My original file has this bitrate. The program needs this number as to see what is the total file size of audio+video. The more space occupied by audio, the less we have for video.
- Overhead: 2% this is how much space is used by the mp4 container. I haven't found the exact number, but 2% seems to keep the file close to what I intend it to be.
The number that appears under Video Datarate is the one you want to use in handbrake (3135.981 Kbps). Make sure you have the result in Kbps.

Back to handbrake. After setting the Average bitrate, we get into the H.264 codec options. Here we can make a huge difference on the end result in terms of look&feel of the video. Of course there is a trade off: the better looking the video the more time is needed to encode it, and a better processor needed to decode it. For example an iPad 1 will struggle to decode the video with the settings I will use here.
Handbrake x264 options
Use x264 Advanced Options Panel: unchecked as we will use this more basic interface
X264 Preset: Very Slow. Here the options on the scale go from Ultra fast to placebo. Ultra fast as the name indicates is a extremely quick encoder, but at the cost of video quality. For example same colors tend to be blocks vs. HD resolution. This is the setting I find affects video quality the most, the slower you encode the better the end result will be. Placebo speed is overkill, giving only slightly better results than very slow at a extreme time cost.
X264 Tune: Film. Select the type that is closest to the content you are encoding. Possibilities are:
Handbrake x264 tune
  • Film: Filmed footage (I.e. Real life movie) footage, not Cartoons or Anime. If in doubt, use this one by default.
  • Animation: Use for hand-drawn animated content.
  • Grain: Use for very grainy or old content.
  • Still Image: Use for Photo slideshows or presentations where there is very little moving content.
  • Psnr/sslm: used for testing. Do not use.
  • Zerolatency: Optimise for faster decoding, Useful for low power devices that struggle to decode the video like ipad 1.
  • Fast decode: uncheck
H.264 Profile: High. There are 4 options here:
handbrake H.264 profile
  • Auto: will automatically set the profile based on all the options that have been selected.
  • Baseline: Baseline is the most basic form of encoding. While decoding is much easier, it may also require much higher bit-rates to maintain the same level of quality.
  • Main: The middle ground. Most modern / current devices will support this profile.
  • High Profile: For best quality and filesize at the expense of CPU time in both decode and encode.
If after encoding the video stutters on the playback device, try lowering this from high profile to main or baseline.
H.264 Level: 4.0. This has to do with frame rate and resolution. Leave with handbrake default.
Change to the Audio tab in handbrake:
Handbrake audio tab
As I don't want to re-encode the audio for this video we choose "Audio Passthru" from the drop down list.

Go back to video and check that everything is OK.
Handbrake encode check
If yes, press add to queue. If you want to encode more than one file, repeat the process after selecting source for the next file. When you have everything in the queue, press start. Leave the computer for a couple hours to encode... And voila!!!!! Compressed movie done!

Friday, October 25, 2013

Enabling TRIM for SSD in MacOS #Mavericks

On my MacBook Pro I installed a Samsung 430 256GB SSD hard drive.

Unfortunately, Apple set as a default on it´s operating systems (Mountain Lion was also like this) that any 3rd party SSD (not installed by Apple) will not have TRIM support.

 Why TRIM support?

From how I understand it, SSDs are extremely slow in writing vs. their reading speed. They are even slower if the block they are writing to still has data (i.e. you erased something, but the block wash´t rewritten to zero - this happens also with normal HDDs) as it first needs to reset to zero and then overwrite the new data.

As to speed up the disk, most SSDs have a Garbage Collector functionality that is setting the blocks that have erased data to Zero.

TRIM is a communication in-between OS and the SSD that helps define which blocks need to be erased. This leads to less writes - and we all know the big limitation of SSD is the number of write cycles we can do with it.


So.. to enable TRIM in MacOS Mavericks

1) Check if you have trim enabled or disabled. Go to Apple symbol -> About this Mac -> More info -> System report

2) In the side panel select SATA/SATA Express and check for your SSD if ¨Trim Support” has yes or no.

Mavericks System Report

3) If it has ¨No¨,  Download a program called Chamelon SSD Optimizer. It is Freewaren you are free to donate to the owner via Paypal.

Get it here: http://chameleon.alessandroboschini.it/index.php

4) Mavericks will not let you open the app due to the security settings

Mavericks unidentifed developer

5) Go to System Preferences -> Security & Privacy

Mavericks system preferences

6) Mavericks has a really good new feature where it allows you to raise a security exception for only 1 program. In mountain Lion you would have to change security settings for all apps, execute and then set back. For Mavericks it recognized Chameleon SSD Optimizer gave an error and has a button for you ¨Open Anyway¨. press it.

Mavericks Security and privacy

7) It will still give one warning. Press open

Mavericks application opened from internet

8) When Chameleon opens, press the lock symbol on the bottom left and introduce your administrator / system password. Then just move the TRIM slider to ON.

Chameleon

9) Reboot the machine

10) go back to Apple symbol -> About this Mac -> More info -> System report and see if TRIM is enabled.


Enjoy!

Time Machine Issues after upgrading to #Mavericks: Black screen or non-available Backups

I currently have an Apple Time Capsule serving the Wi-Fi of my house and handling the automatic Time Machine backup of two Macs. I had some issues installing Mavericks, which forced me to do a fresh install. I thought everything would be okay because I had all my information on my Time machine, right? Not exactly.

After installing the operating system I tried doing the Apple migration. However, what Time Machine managed to recover wasn’t exactly my old computer as it left orphans. Some applications were not installed but continued to have the Preferences panel in the System Preferences (Such as the go pro cuneiform, or the perian), or if they were kept at the dock there would be a question mark in it´s place.

Instead of trying to figure out what was right and what was wrong on this installation, I reinstalled Mavericks again and decided to get the information I needed out of the Time Machine like the documents folder, then the Desktop, etc… 

This is where the problem started. On entering Time machine on the time bar to the right, my previous backups where light purple - they could´t even be selected.

Solution:

1) connect to Time Machine via LAN cable and to WiFi - it´ll be much faster

2) Press the Option (alt) key while pressing the time capsule symbol on the menu bar. There will be a new option ¨Verify Backups¨ where ¨Back Up Now¨ was.

Time Machine Verify backups

3) Let it Verify. When it is finished, the the bars will be Purple, and the Time Capsule will go into them


Problem #2 - After all this Time Machine would show me black boxes only, vs. the normal finder window!

Time Capsule Black Screens


The black screens are because the Time Machine has defaulted into a folder that it has not backed up. i.e. If you are in the Applications folder before getting into Time Machine and it does not have that folder backed up, it will show the black screen.

Solution:

1) Open finder (outside of Time Machine)

2) Go to your computer, or press CMD-Shift-C. 

3) Select the hard drive that you have backed up

Mavericks Finder

4) Enter Time machine again via ¨Enter Time Machine¨ on the menu bar

Time capsule menu

5) You should be able to navigate to /Users/<your user name> and get any file you need


Thursday, October 24, 2013

How to Log-in to Flickr in #Mavericks with a Google account

I had some difficulties setting this up as the shortcut to set-up Flickr in MacOs Mavericks does´t work with google accounts. Putting your gmail address and password (or application specific password if you have 2-step verification does´t work).

However I have found a work-around:

1) Login to the flickr webpage

2) Hover over your logo on the top right hand corner then click on ¨settings¨

3) Click on Edit your yahoo! preferences

Yahoo Account preferences


4) On the Yahoo! webpage that appears, login with your google credentials

5) Click on the top right corn Mail symbol

yahoo mail symbol

6) Set-up a yahoo email address and password.

7) In MacOs Mavericks go to Settings -> Internet accounts

8) Press the + sign

9) Scroll down on the right panel to Flickr:

MacOs Mavericks: Internet Accounts

10) Add the login details of the yahoo email address and password you created with 6

Mavericks Flickr

How to setup Hotmail or Outlook.com with IMAP on MacOS #Mavericks


After today´s complicated installation of Mavericks that made me do a fresh installation, I had to set-up all services again.

Despite having a better protocol with Exchange support, which has support within Mavericks, Microsoft has decided to limit exchange support to mobile devices (iPhone, Android and Windows Phone) and keep desktop clients except for Outlook 2013 cut off. The solution to not install POP3 which does´t allow synchronisation in-between devices is to use IMAP. 

This is step by step instructions on how to install a Hotmail or Outlook.com on the mail app of Mavericks:

1) Go to Settings, click on internet accounts

Screen Shot 2013-10-24 at 22.06.18 

2) On the right list, scroll down to ¨Add other Account…¨

Screen Shot 2013-10-24 at 21.11.48

3) Put the radio button next to ¨Add a Mail account¨ and press Create

Screen Shot 2013-10-24 at 21.22.56

3) In the add a Mail Account screen:

      Full name: The name you want to appear when people receive your emails

     Email address: Your hotmail / Outlook email complete address 

     Password: Your hotmail / Outlook email  password

Press next 

Screen Shot 2013-10-24 at 21.23.27

3) It will say account needs to be manually configured. Press ¨Next"

Account Type: IMAP

Mail server: imap-mail.outlook.com

 User name: Your hotmail / Outlook email complete address 

Password: Your hotmail / Outlook email password

Press next 

Untitled


4) After displaying ¨verifying¨ it will say ¨Additional account information required. Press next

Port: Change from 995 to 993

Use SSL: Checked

Authentication: Password

Press next 

Untitled 2

5) In the outgoing mail server screen:

SMTP server: smtp-mail.outlook.com

 User name: Your hotmail / Outlook email complete address 

Password: Your hotmail / Outlook email password

Press Create


Untitled 2

and you are done!!!


P.s. If you have two-factor authentication enabled for your Hotmail or Outlook.com account, before the above, create an application-specific password as your normal account password will not work.

Here's how to create an application-specific password:

1. Go to outlook.com / hotmail.com and login to your account

2. Go to Account Settings

3. Open Edit security info

4. Under App passwords, open Create a new app password