I don't like having my iTunes library on my Mac. Main reason is that it occupies a LOT of space. Besides all the music you have downloaded and it's artworks, which can already be several GBs, iTunes also backs up to your Mac all IOS apps you downloaded. Even if you delete them on your iPad or iPhone , they stay on your Mac - depending on how many apps you have and the size of them, this can be huge.
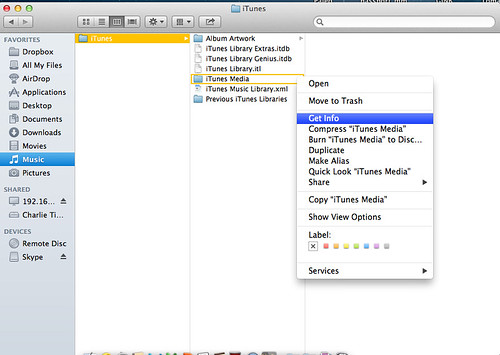
Don't believe me? If you have default Itunes settings, On your Mac go to Music -> iTunes. Under the subfolders iTunes Media right click ( or option click ) and choose "Get info". Check the window that appears for the size of this folder. Do the same for "Album Artwork".
 |
| Free space by sending your iTunes library to your Synology! |
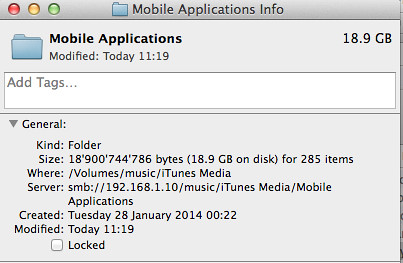
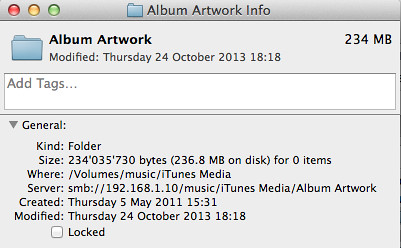
On my computer, Album artworks occupy 234Mbs, and iTunes media a whopping 18.9GBs!!!
 |
| Free space by sending your iTunes library to your Synology! |
 |
| Free space by sending your iTunes library to your Synology! |
I don't need all these things on my Mac - IOS apps are useless to keep there, and even music will be heard on my iPhone, so why keep it on the Mac? And with the latest MacBook Air and MacBook Pro using SSD there isn't a lot of spare space.
iTunes has no setting that allows you to specify where to keep specific music or app files. There is just one setting to send all iTunes library. And the incorporated Synology "iTunes server" package created a shared media server, not what I need.
So I decided to find a smart way to get space back by sending apps and music to the Synology.
!This solution will only work if you sync / use iTunes on the same network that you have your Synology!
The basic idea is that you create a alias the points from the iTunes media folder on your Mac, to a folder on your Synology. ITunes will still think it is accessing "iTunes media" on the local computer, but in reality it is accessing the Synology folder!
1) Create a shared folder on the Synology. For this example I created one called iTunesSynology, but it can have any name.
2) Ensure iTunes is closed on the computer and you don't launch it accidentally ( I.e. Via plugging in an iPhone or ipad ).
3) Ensure you are connected via some file sharing protocol to your Synology and to the "iTunesSynology" shared folder I use SMB, out you can also use AFP. To connect to the shared drive:
Finder -> Go -> Connect to server
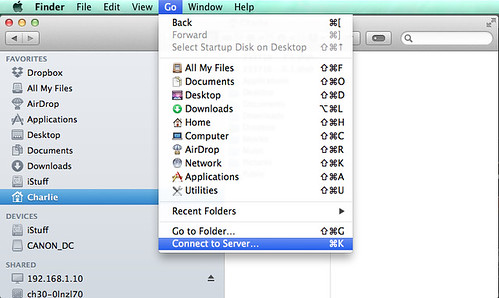 |
| Free space by sending your iTunes library to your Synology! |
After you need to put in the Synology IP, password and login:
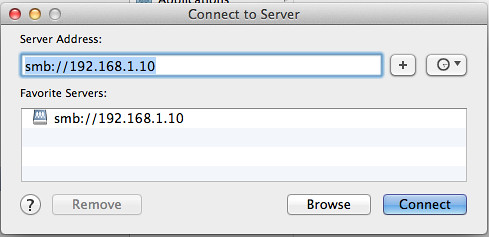 |
| Free space by sending your iTunes library to your Synology! |
In Finder, go to the shared tab and open iTunesSynology folder under the Synology server.
For this to work, every time you use iTunes you need to ensure you are connected to the Synology "iTunes" shared folder via the step above.
4) Move the "iTunes Media" and "Album Artwork" folders from under the Mac ->Music -> iTunes folder to the "ITunesSynology" folder on the Synology
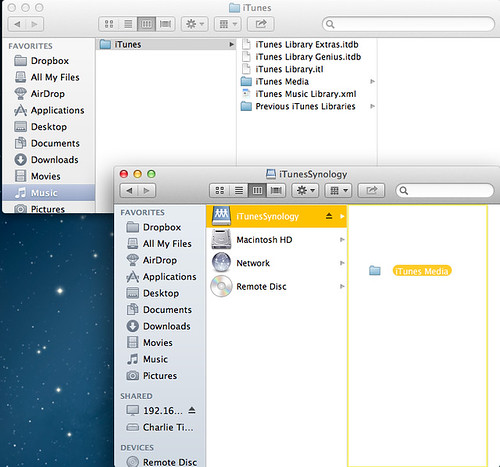 |
| Free space by sending your iTunes library to your Synology! |
5) When the file transfer has finished, while pressing Command and Option (Alt) key on the keyboard, drag the "iTunes Media" folder back to the iTunes folder on the Mac. If you are doing it right, the folder icon should have an arrow on it while you drag, and in the end should look like this ( note the arrow on top of the folder icon of iTunes media on the Mac ):
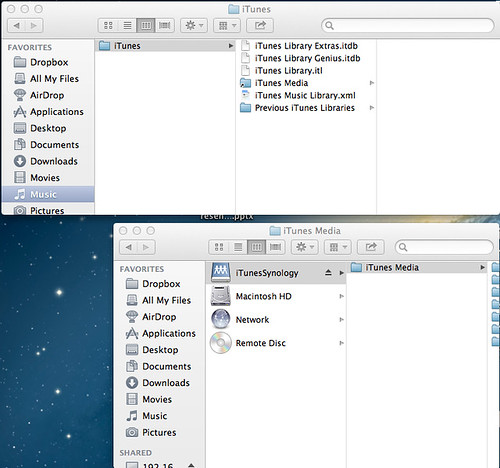 |
| Free space by sending your iTunes library to your Synology! |
6) Launch iTunes! Test a couple of songs, it should work perfectly!!! Just make sure before iTunes opens that you are connected to your Synology.
Congratulations, you just released quite a couple of GBs off your Mac!
