Saturday, December 07, 2013

Streaming Movies & Series from Synology to AppleTV

Synology has several ways for video streaming from it's hard drives. The one I use the most is sending via DLNA to the Playstation3, which means that it appears on the PS3 menu.Adding an AppleTV to the home network I wanted a way to stream to the it as well, not just to have 2 ways of doing the same thing, but sometimes with my DVD backups (I prefer to have all movies on 1 hard drive and choose then opening DVD boxes and swapping discs) I get the Cinavia protection error on the PS3.Unfortunately AppleTV doesn´t have DLNA, however synology has thought of a solution.

Synology has an app for IOS devices called Video Station. I normally use it to stream video to my IOS device out of home. So when I'm at the airport or train, I can see videos directly from my Synology which is at home over the internet, only requirement being a 3G or wifi connection. If you are in your home network, as of the latest update you can choose to send to AppleTV.

How to use:1) Download & Install the Video Station package on the Synology2) Download the DS Video app from iTunes on your iPhone or iPad3) Ensure you have the correct ports open for your home network.

Video Station5000 (HTTP), 5001 (HTTPS), 9025-9040,
5002, 5004, 65001 (for using the HDHomeRun network tuner)
TCP
DS video5000 (HTTP), 5001 (HTTPS)TCP

For more ports see the following link:https://www.synology.com/en-global/support/faq/299

4) On the Synology you just need to make sure that the Media Server has within the directories it has indexed the one with your media files. The Video Station will see the files and automatically search the internet for the information needed to show on it´s page, including IMDB link.

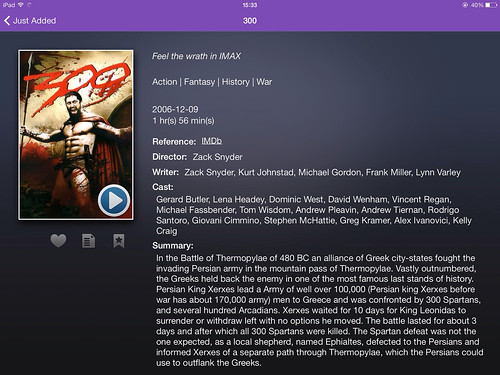
5) Open the app and login

6) Press the play button

7) Press the icon on the bottom right and choose AppleTV


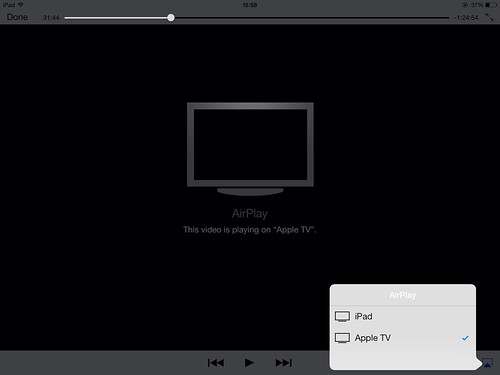
8) Wait 1 minmute while it sets up and done it's on the TV!

I've only seen two limitation, first is that you must keep the app open for the duration of the movie, even multitasking is not allowed and second it takes a while to start playing the movie for the first time (1 - 2 minutes)


AppleTV issue: Unable to login to iCloud as I can´t pass the iCloud Terms of Use

For my birthday my friends got me an Apple TV. Today I was making a new trailer for my youtube channel:

and I saw an interesting new function that comes with iMovie and the AppleTV update - the iMovie theater. When you finish editing your video, you can share to iCloud and it will automatically appear under this icon in AppleTV. You don't need to have a computer or iPad to see it, just press the icon and it streams automatically!

However, when logging on to iCloud on the AppleTV, after entering the login and password for the service, the terms of use screen would appear but as much as I would press accept it would repeat the screen.
The solution is simple:
1) Go to settings

2) Go to General


3) Go to Region format

4) Change from United States to your iCloud region

5) Try again to login into iCloud and accept the terms & conditions

Should work now!

Thursday, December 05, 2013

Scared of losing years of Photos? Here is the perfect backup solution

Two things can easily happen to your computer: HDD failure or get stolen. Of course, you can always put in a new HDD or buy a new computer and install the OS and all the programs you use. It's time consuming but not the end of the world. But then the thought comes - when was the last time I backed up???

Oh no, THE foto and video collection. The one you have been archiving since your first digital camera or your friends' first digital camera. Probably older files are on some external drive, but you haven't updated it in the last 9 or 12 months, almost a year of memories lost.

This already happened to me once, and ever since I've been looking for a solution. Enter the Synology NAS server - it sounds and looks geeky, but WOW, it solved my backup problem in several ways and added tons of extra functionalities like torrent managing, media server, internet server for pictures / streaming video and home camera surveillance.
What is a NAS server? Basically a hard disk plugged into your home network - a shared drive that any device on your home WIFI can access. Synology took the concept one step further and included RAID and a processor that can do things with the information on the hard disk such as uploading them to online storage or creating an online webpage for your pictures that you can access anywhere in the world. I'll talk about this in an upcoming post, for now backup.
I wanted something that could:
- Take care of automatic backups from my Mac / PC
- protect itself from failure of it's own HDD
- upload pictures / videos to the cheapest online backup. Reason being that if someone steals my house and my computer and the synology, the backups on it are not very useful....
The device I found that ticked all these boxes and was "cheap" is the Synology DS212j. Nowadays they've launched an upgraded version - the DS214 which adds more internal RAM memory and an improved processor. Functionalities are the same. Besides the device, you need to buy separately the HDDs to put inside. To have RAID ( explained in a second ) you should have two same sizes HDDs, I got 2 x Western Digital's Red 3TB HDDs. The Red family are made to work on NAS servers, prioritizing longetivity and low heat generation over speed - which you don't need as much Ina. NAS server vs a computer. These disks are designed to be on 24/7, just like your synology.

Why the Synology?
- Take care of automatic backups from my Mac / PC:
For Mac it has time machine functionality, a software included in the Mac by Apple that backs up all your computer content automatically to a time machine device. It also can handle automatically complete restore of your information in case of issues with the Mac.
For windows it has software that can automate backups, although if haven't used it yet (only use macs for now...)
- protect itself from failure of it's own HDD
With 2 hard disks installed, it mirrors all information automatically in between them. Meaning that if one HDD fails, all info is stored on the other one. Synology handles this without any involvement from you - you only see one shared drive and once the info.
- upload pictures / videos to the cheapest online backup. Reason being that if someone steals my house and my computer and the synology, the backups on it are not very useful. Synology can upload to several online storage sites p, but for me the mist interesting is Amazon glacier. It's real cheap, I think I have approx 300Gbs put there and I pay approx 4USD per month. With Dropbox a 200Gb plan is 19.99USD and 500Gb a whopping 49.99USD. I save 400 to 500$ per year. The catch? It isn't like Dropbox that you always have access to your files. With glacier you request a file and it is only available 4 hours later.
To be honest, none of these files I need in a rush - they are always local on my Synology. Amazon glacier is online backup just in case the Synology is stolen.... And probably I can wait a little while to download them when my house has been burglarized - they are not priority #1. Amazon even has a service where you can send an external HDD and they record all files there.
Set-up posts coming up!

Sunday, November 10, 2013

iPad Air: setting up for the first time


When you get your new iPad Air out of it's box, you really want to turn it on!

 
This is a tutorial on how to set it up as a fresh, new IPad, not restoring it from a previous backup.
 
First screen is a Hello screen which will do a sideshow of the word hello in several languages, to start the initial set-up slide from the arrow to the right.
IPad Air IOS 7: first set-up  charlietechlife.blogspot.com
 
In the next screen choose which language you want the iPad to be in, when you press it will go automatically to the next screen
 
IPad Air IOS 7: first set-up  charlietechlife.blogspot.com
 
Select your country or region from the next screen. This will help the iPad set-up regional settings such as how it shows the date, the currency, numbers, etc... It also will default your App Store to that country - it is easily changed after if needed.
 
IPad Air IOS 7: first set-up  charlietechlife.blogspot.com
 
The next setting is wifi. If you aren't setting up tethered to a computer with iTunes you will need wifi to proceed aporia install apps. Press on your wifi and insert the password if you have one.
 
IPad Air IOS 7: first set-up  charlietechlife.blogspot.com
 
The iPad will take a few moments to contact Apple's servers and activate itself
 
IPad Air IOS 7: first set-up  charlietechlife.blogspot.com
 
Next screen is to turn location services on or off. If you are extremely concerned with privacy I would turn them off otherwise keep them on as to have applications such as maps know where you are and be able to supply directions or even have the iPad change the time automatically when you go to a new time zone.
IPad Air IOS 7: first set-up  charlietechlife.blogspot.com
 
In the next screen you can restore settings from another iPad device (if you are upgrading or changing iPad) from iCloud or from iTunes. Since we are setting up the iPad as a new device, we press set up as new iPad.
 
IPad Air IOS 7: first set-up  charlietechlife.blogspot.com
 
Next screen is to set-up your Apple ID. Very useful for downloading apps or music on the App Store / iTunes music store or for FaceTime calls. If you don't have an Apple ID yet you can create one here.
IPad Air IOS 7: first set-up  charlietechlife.blogspot.com
 
Next screen is for you to agree with Apple's terms and conditions. The agree button is way down on the button to the right. Another pop up comes up. Press agree again.
 
 
IPad Air IOS 7: first set-up  charlietechlife.blogspot.com
 
IPad Air IOS 7: first set-up  charlietechlife.blogspot.com
 
It will take a few minutes to communicate with Apple and set-up your ID
 
iPad Air IOS 7 first set-up  charlietechlife.blogspot.com
 
Next screen is about iCloud. iCloud can automatically synchronizes several items with apple servers. The advantage for you is that it is a secure online backup ( in case your iPad is stolen or breaks ) and it automatically pushes to your other Apple devices - such as a picture that you take with the iPad will appear automatically on your iPhone or on iPhoto on your MacBook if they are logged on to the same Apple ID. You can choose what to synchronize afterwards, options are email, contacts, calendar, reminders, Safari history / favourites, notes, the new keychain, photos, documents and apps and find my iPad.
 
iPad Air IOS 7 first set-up  charlietechlife.blogspot.com
 
Next screen after iCloud is Find my iPad! which allows you to pinpoint on a map where your iPad is, if it is connected to a wifi or 3G, and even send messages, lock it or in extreme cases erase all it's info A very useful feature that most people don't know about. 
Imagine you lost your iPad, you can send a message to it that appears on the lock screen saying:
Please contact phone number xxxxx 
To try and get it back.
I would have it enabled.
 
iPad Air IOS 7 first set-up  charlietechlife.blogspot.com
 
After choosing Find my iPad, the next screen you can choose if you want iMessage and FaceTime activated and in which email / phone number people can reach you. Have ticked where you want people to be able to FaceTime you. You can turn off iMessage or FaceTime individually later.
iPad Air IOS 7 first set-up  charlietechlife.blogspot.com
After all these iCloud settings it will take a few minutes to set it up:
iPad Air IOS 7 first set-up  charlietechlife.blogspot.com
 
It will then set-up the lock screen passcode. Insert a four digit number you can remember.
 
iPad Air IOS 7 first set-up  charlietechlife.blogspot.com
 
You can set-up the iCloud keychain, useful if you have multiple Apple devices to keep passwords. Particularly useful if you have a Mac with MacOS Mavericks and you don´t want to memorise a lot of passwords. Not sure how secure it is yet….
 
iPad Air IOS 7 first set-up  charlietechlife.blogspot.com
 
And done! Press get started to start using your new iPad!!!
 
 
iPad Air IOS 7 first set-up  charlietechlife.blogspot.com
 
In the next post, how to set-up email and others!


Thursday, November 07, 2013

iPad Air Diary: Day 2


24 hours afterwards, here are some more impressions of the iPad Air.

 
Coming from an iPad 1, the size and especially the weight continue to impress. Weight wise, it's really light. Continueing Apple's comparison with pencils, it weighs less than a box of Caran D'ache color pencils - it's that light. 
Reading with it is enjoyable as holding it up over a long period of time doesn't tire you.
 
Size, it's small and thin - really thin. Since I didn't buy a cover yet, I currently stor it in the backpack in the middle of a bunch of A4 sized papers  I'm reading. It gets lost in there.
 
After you start using it, there are two things that you notice - first is the retina display! A big difference when upgrading from a previous non-retina device. Your eyes can see the difference. Especially if you go back to using the old device it now seems that everything has jagged edges, like if you were seeing a 8bit video game.
 
Second is the touchscreen, the iPad airs has an improved feel to it when typing. It has a softer feel than the iPad 1. It's like the 1 is a hard glass surface with no flexibility, whilst the iPad air has a slight impact absorption to it - like it's not 100% hard. Much better when typing for long periods of time!
 
The speed is MUCH better than the original iPad, however I'm not very impressed. Reading about the iPad air on the internet, tech blogs compare it's power to that of a 2010 MacBook Air. However while using it doesn't feel that fast. I haven't done CPU intensive tasks such as movie editing with iMovie, so it may be because of IOS7 animations ( I'm still keeping my IPhone on iOS6, so it's my first experience ), however the opening of apps, games, switching apps, they all seem to go at a "normal" speed - not blazing quick.
 
So, what did I do on day 2?
 
I installed the iPad as a new device vs from the backup of my iPad 1, so the first hours were spent installing apps, email addresses, calendars, etc...
 
Apps: One really good thing of the iPad air is that Apple offers iWork and iLife apps (Pages, Numbers, Keynote and iMovie, iPhoto and GarageBand) for free automatically. You just need to enter the App Store and download them - it changes the price to free if you enter with the iPad air. Good news is you can then sync to iTunes on a Mac / PC and resync the apps to all other IOS devices such as your iPhone - it is still free.
 
iPad air
 
The wifi when downloading is quick, but given the new apple technology I expected more. It's .. Normal.
 
Email / contacts: pretty straightforward as with any IOS device. For gmail, hotmail, etc.... It's very easy with a dedicated set-up for these types of email:
iPad air
For other types of email, it helps to have the settings such as server name, incoming / outgoing port numbers, etc....
 
The only issue I've seen is with Facebook integration. For some reason the Facebook integration rejected my password and now doesn't let me change / add a new one. And it constantly gives the error message below:
 
IOS7.0.3 facebook error
 
When I have a solution I'll post it to the blog.

Tuesday, November 05, 2013

iPad Air Diary: Day 1, Set-up and first impression review

It's my birthday. Well, almost my birthday but lucky for me my wife likes to give presents before.

But before opening the gift, some background so you see why my impressions of the iPad air are what they are. I got the original iPad as a birthday gift (amazing wife I have) when it came out in 2010. I never would have bought it - thought it was a silly over sized version of an iPhone but when I got it, I couldn't put it down. Really. I would spend sleepless hours in bed touching, pointing, reading, playing. It was THAT magical.
Recently my iPad 1 still has it's place on the living room table, but I use it less and less. Why? because it simply got too slow, and lost the magic of everything just working quickly. Using safari is a struggle, opening several webpages almost impossible. HD movies stagger on it. I think it's "normal" as the iPad 1 was a Steve Job's experiment and nobody knew at the time it would have the amazing sell-out that it did. It had reduced CPU and memory specs, which Apple would improve a lot with the iPad 2, which is still sold to date. The poor 1 didn't age well, making me prefer to use my 2010 Macbook Pro which with a SSD hard drive upgrade flies....

Fast  forward to 2013...
Out from hiding comes a little bag with my gift. My first look at the bag left me perplexed, I had said (not directly) that I might like to have an iPad but this box is too small! Opening the wrapping, it's definitely an Apple box and... YES! An iPad! I open the box and pull it out. But, my first thought was "Oh crap!" she bought the iPad mini and that just seeing the size of the box! When I open it and see the device, I was convinced - she really bought the iPad mini - how do I tell her to exchange it?

iPad Air WiFi 32Gb White / Silver MD789LL/A


But no, reading the box, it's a brand new Silver iPad Air 32Gbs Wifi only model, just what i wanted! It's that small! at least for someone used to an iPad 1. How does Apple do it? I ran for my iPad 1 and compared.

iPad 1 vs. iPad Air

Of course the iPad cover does´t help….so taking it off

The screen size is similar, however they reduced the bezel and made in extremely thin. As thin as a pencil, just like the Apple ad ...

Turn it on and the screen is much more detailed than the iPad 1! I spent the whole night configuring, installing email, apps, etc...
Still remember when we used to need to many things tethered to iTunes, nowadays it's all via wifi. Wow!

More review to come on diary day 2....

I love my new iPad Air already, however there is one thing that I miss - the feeling of magic! This is probably what is missing in the post Steve Jobs era, somebody that invents products that WOW you and change your habits dramatically. The first iPad did that for me. This iPad is an upgraded version of that, fast, beautiful, light - but it is an iPad.

Saturday, October 26, 2013

#Mavericks & iTunes error

After reinstalling Mavericks, I tried synchronising iTunes (after copying back my library from the previous installation) and my iPhone. I got the following error message “The iPhone “xxx" could not be synced because this computer is no longer authorized for purchasing items that are on this iPhone."
Mavericks iTunes error
I believe it´s because me and my wife both used the phone, so we had a mix of apps she purchased under her ID and some I purchased under mine. One app is not allowing us to sync
The solution is:
1)on the  iPhone go to Settings->Store. If the following screen appears you are signed in. Press your AppleID and sign out.
iPhone settings

You should now have this screen. If you already did, do nothing
iPhone settings
2) On iTunes go to Store -> deauthorize this computer. Enter login and password
3) On iTunes go to the iPhone -> Apps. Remove all apps (don´t worry, you will reinstall them)
4) On iTunes, press sync
5) On iTunes go to Store -> Authorize this computer. Enter login and password
6) On iTunes go to the iPhone -> Apps. Reinstall apps.

MacOs #Mavericks: Can read but can´t write to an external drive?

If you have a big enough USB stick or external USB hard drive and use it with Windows, chances are they are formatted with NTFS.  The good thing is that as of Mac OS X 10.3 and later Apple introduced support for NTFS drives,  however by default it´s read only. Meaning you can see & use whatever the drive has, but can´t add or change information on it (like having a CD-ROM drive). Not an ideal solution.
There are two ways to change this behaviour in MacOS Mavericks, via the Apple driver or 3rd party software

1) Set-up with the Apple driver:
Pros:
- No 3rd party driver needed that you need to spend money with
Cons:
- You need to set it up one device at a time
- Not 100% reliable

1) Make sure your NTFS drive has a name with only one word (i.e. no spaces)
2) Open Terminal: Utilities -> Terminal
MacOS Mavericks Terminal
3) execute:
sudo nano /etc/fstab
It will ask you for your administrator password

4) Add the following line :
LABEL=<USBNAME> none ntfs rw,auto,nobrowse
 Replacing <USBNAME> with the name of your external hard disk
MacOS Mavericks Terminal

5) Press Ctrl-X to exit, and Yes to the question if you want to save and keep the same filename
6) Eject your external drive via Finder
7) Reconnect your external drive
8) In the Terminal window, execute:
open /Volumes
Done!

2) Set-up with 3rd party software
Pros:
Easy to use, no configuration needed. Just install, restart your computer and done
Works with any HDD USB key without needing to configure each new device
Cons:
Not free, but does have 14 day trial

1) Download driver from
http://www.paragon-drivers.com/ntfs-mac/
2) Install
3) Restart
There will be a new icon within System Preferences that allows you to change any permissions you might need and register the software.
MacOS Mavericks Terminal
4) Plug in any NTFS drive you want, they allow reading and writing.

Friday, October 25, 2013

Enabling TRIM for SSD in MacOS #Mavericks

On my MacBook Pro I installed a Samsung 430 256GB SSD hard drive.

Unfortunately, Apple set as a default on it´s operating systems (Mountain Lion was also like this) that any 3rd party SSD (not installed by Apple) will not have TRIM support.

 Why TRIM support?

From how I understand it, SSDs are extremely slow in writing vs. their reading speed. They are even slower if the block they are writing to still has data (i.e. you erased something, but the block wash´t rewritten to zero - this happens also with normal HDDs) as it first needs to reset to zero and then overwrite the new data.

As to speed up the disk, most SSDs have a Garbage Collector functionality that is setting the blocks that have erased data to Zero.

TRIM is a communication in-between OS and the SSD that helps define which blocks need to be erased. This leads to less writes - and we all know the big limitation of SSD is the number of write cycles we can do with it.


So.. to enable TRIM in MacOS Mavericks

1) Check if you have trim enabled or disabled. Go to Apple symbol -> About this Mac -> More info -> System report

2) In the side panel select SATA/SATA Express and check for your SSD if ¨Trim Support” has yes or no.

Mavericks System Report

3) If it has ¨No¨,  Download a program called Chamelon SSD Optimizer. It is Freewaren you are free to donate to the owner via Paypal.

Get it here: http://chameleon.alessandroboschini.it/index.php

4) Mavericks will not let you open the app due to the security settings

Mavericks unidentifed developer

5) Go to System Preferences -> Security & Privacy

Mavericks system preferences

6) Mavericks has a really good new feature where it allows you to raise a security exception for only 1 program. In mountain Lion you would have to change security settings for all apps, execute and then set back. For Mavericks it recognized Chameleon SSD Optimizer gave an error and has a button for you ¨Open Anyway¨. press it.

Mavericks Security and privacy

7) It will still give one warning. Press open

Mavericks application opened from internet

8) When Chameleon opens, press the lock symbol on the bottom left and introduce your administrator / system password. Then just move the TRIM slider to ON.

Chameleon

9) Reboot the machine

10) go back to Apple symbol -> About this Mac -> More info -> System report and see if TRIM is enabled.


Enjoy!

Time Machine Issues after upgrading to #Mavericks: Black screen or non-available Backups

I currently have an Apple Time Capsule serving the Wi-Fi of my house and handling the automatic Time Machine backup of two Macs. I had some issues installing Mavericks, which forced me to do a fresh install. I thought everything would be okay because I had all my information on my Time machine, right? Not exactly.

After installing the operating system I tried doing the Apple migration. However, what Time Machine managed to recover wasn’t exactly my old computer as it left orphans. Some applications were not installed but continued to have the Preferences panel in the System Preferences (Such as the go pro cuneiform, or the perian), or if they were kept at the dock there would be a question mark in it´s place.

Instead of trying to figure out what was right and what was wrong on this installation, I reinstalled Mavericks again and decided to get the information I needed out of the Time Machine like the documents folder, then the Desktop, etc… 

This is where the problem started. On entering Time machine on the time bar to the right, my previous backups where light purple - they could´t even be selected.

Solution:

1) connect to Time Machine via LAN cable and to WiFi - it´ll be much faster

2) Press the Option (alt) key while pressing the time capsule symbol on the menu bar. There will be a new option ¨Verify Backups¨ where ¨Back Up Now¨ was.

Time Machine Verify backups

3) Let it Verify. When it is finished, the the bars will be Purple, and the Time Capsule will go into them


Problem #2 - After all this Time Machine would show me black boxes only, vs. the normal finder window!

Time Capsule Black Screens


The black screens are because the Time Machine has defaulted into a folder that it has not backed up. i.e. If you are in the Applications folder before getting into Time Machine and it does not have that folder backed up, it will show the black screen.

Solution:

1) Open finder (outside of Time Machine)

2) Go to your computer, or press CMD-Shift-C. 

3) Select the hard drive that you have backed up

Mavericks Finder

4) Enter Time machine again via ¨Enter Time Machine¨ on the menu bar

Time capsule menu

5) You should be able to navigate to /Users/<your user name> and get any file you need


Thursday, October 24, 2013

How to Log-in to Flickr in #Mavericks with a Google account

I had some difficulties setting this up as the shortcut to set-up Flickr in MacOs Mavericks does´t work with google accounts. Putting your gmail address and password (or application specific password if you have 2-step verification does´t work).

However I have found a work-around:

1) Login to the flickr webpage

2) Hover over your logo on the top right hand corner then click on ¨settings¨

3) Click on Edit your yahoo! preferences

Yahoo Account preferences


4) On the Yahoo! webpage that appears, login with your google credentials

5) Click on the top right corn Mail symbol

yahoo mail symbol

6) Set-up a yahoo email address and password.

7) In MacOs Mavericks go to Settings -> Internet accounts

8) Press the + sign

9) Scroll down on the right panel to Flickr:

MacOs Mavericks: Internet Accounts

10) Add the login details of the yahoo email address and password you created with 6

Mavericks Flickr