
So I started investigating how I could compress those videos into a more reasonable size. My objective is to have each file reduced to approx. 1Gb with minimal quality loss and be compatible with playback on PS3, IOS devices, Windows, etc..., so I need a compression codec (divx, xvid, x264) and a container (.avi, .divx, .mkv) compatible with these devices.
On the Mac there are two software programs that are FREE that allow you to do just this. One is Handbrake, a free video transcoder that works extremely well. The second is Mediacalc, a bitrate calculator - it's there to ensure your video ends up being the right size.
After you download them following the links above, let's get started!
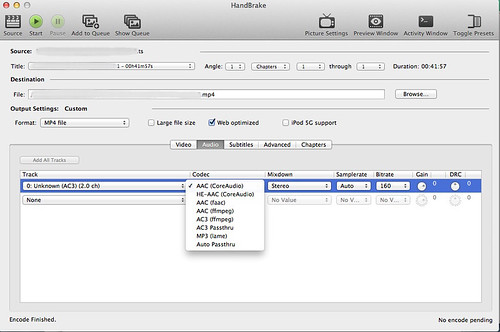
Fire up Handbrake. The interface is pretty straightforward.
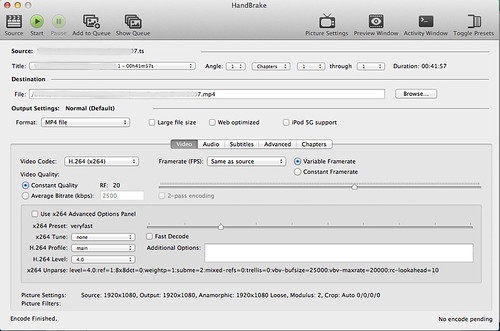
As my Output setting options:
- Format: MP4 file. The mp4 format is playable across most platforms I need (iPad, IPhone, PS3, Xbox...)
- Large file size: uncheck. This is to enable 64bit - it allows files bigger than 4Gb for nonFAT32 systems. Will not affect any compression beneath this size, and if checked can limit compatibility
- Web Optimized: Checked. This places the container header in the beginning of the file. It will make the video start faster if streaming.
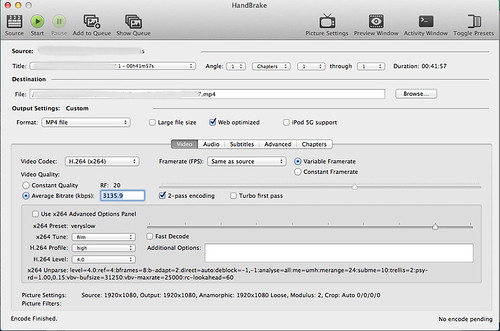
Under the video tab:
- Video Codec: H.264 (x.264). This codes into MPEG-4 part 10, also known as H.264/AVC. It gives much better quality and lower file sizes than the normal MPEG-4 / VP3 encoders and all modern devices like I want to use will support this format. (iPhone, iPad, BluRay Players, PS3, XBox360, etc....)
Framerate: Same as source. I want to keep the video quality as close to the original as possible. As such I keep the same frame rate as per the original one.
Variable framerate: ticked. I keep this as to imitate the original.
Video quality: Average bitrate. Here there is no preview available to see how the video comes out in terms of quality or size, be it using constant quality or average bitrate option. As my main limitation is size, if I wanted to use the constant quality option I would need to try a number on the scale, compress, see file size, try another number and compress again. So for a specific size, I use average bitrate.
2-pass encoding: ticked. Takes longer (almost double the time), but results are worth it.
Mediacalc:
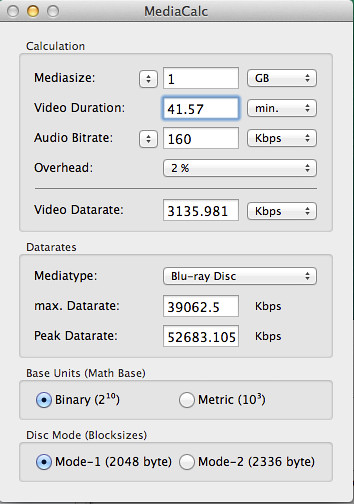
We will just use the first Calculation part of the application. We fill in:
- Media size: 1Gb. This is the final size we want.
- Video Duration: 41.57. Here we put the exact size of our original video that we jotted down from handbrake as per above.
- Audio bitrate: 160kbps. My original file has this bitrate. The program needs this number as to see what is the total file size of audio+video. The more space occupied by audio, the less we have for video.
- Overhead: 2% this is how much space is used by the mp4 container. I haven't found the exact number, but 2% seems to keep the file close to what I intend it to be.
The number that appears under Video Datarate is the one you want to use in handbrake (3135.981 Kbps). Make sure you have the result in Kbps.
Back to handbrake. After setting the Average bitrate, we get into the H.264 codec options. Here we can make a huge difference on the end result in terms of look&feel of the video. Of course there is a trade off: the better looking the video the more time is needed to encode it, and a better processor needed to decode it. For example an iPad 1 will struggle to decode the video with the settings I will use here.

X264 Preset: Very Slow. Here the options on the scale go from Ultra fast to placebo. Ultra fast as the name indicates is a extremely quick encoder, but at the cost of video quality. For example same colors tend to be blocks vs. HD resolution. This is the setting I find affects video quality the most, the slower you encode the better the end result will be. Placebo speed is overkill, giving only slightly better results than very slow at a extreme time cost.
X264 Tune: Film. Select the type that is closest to the content you are encoding. Possibilities are:
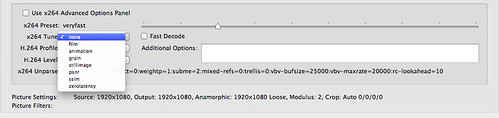
- Film: Filmed footage (I.e. Real life movie) footage, not Cartoons or Anime. If in doubt, use this one by default.
- Animation: Use for hand-drawn animated content.
- Grain: Use for very grainy or old content.
- Still Image: Use for Photo slideshows or presentations where there is very little moving content.
- Psnr/sslm: used for testing. Do not use.
- Zerolatency: Optimise for faster decoding, Useful for low power devices that struggle to decode the video like ipad 1.
- Fast decode: uncheck
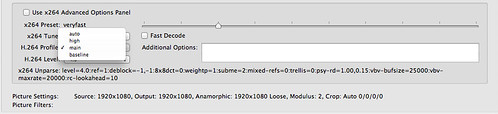
- Auto: will automatically set the profile based on all the options that have been selected.
- Baseline: Baseline is the most basic form of encoding. While decoding is much easier, it may also require much higher bit-rates to maintain the same level of quality.
- Main: The middle ground. Most modern / current devices will support this profile.
- High Profile: For best quality and filesize at the expense of CPU time in both decode and encode.
H.264 Level: 4.0. This has to do with frame rate and resolution. Leave with handbrake default.
Change to the Audio tab in handbrake:
Go back to video and check that everything is OK.
No comments :
Post a Comment